All Great Artists Sign Their Work

This summer, we tackled quite a few projects, and we DEFINITELY got our hands dirty in the process.  A little grime didn’t scare us – attic dust (including a two-foot snake skin), greasy carpet, musty closets, rotting wood, spider webs, rodent nests – we saw it all.  With all this in mind, please be impressed when we declare this our dirtiest job of the summer.

I think at this point, we’ve also established degrees of dirty: there’s dusty-dirty, dirt-from-the-earth-dirty, dirt-due-to-time-dirty, and trash-dirty.  This project created a new category: unsanitary-dirty.

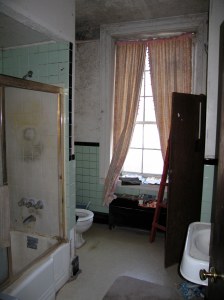
What project deserves these lofty descriptions?  None other than the upstairs bathroom:

Before we moved in this summer, the bathroom situation was my “deal breaker” – I told Chad if I had to use this bathroom in the middle of the night, we were moving out and finding an apartment.  Luckily, although the downstairs bathroom isn’t really our style, it is completely functional, has worked great this summer, and kept me from having a meltdown over the past few months.

Chad’s brother Daniel is moving in soon, and in lieu of rent, he is paying us in a quick fix to the bathroom (this is mutually beneficial, as it means Daniel will also have a private boudoir).  The plumber came to do a quick assessment and we got some great news: no evidence of lead pipes!  Turns out, we’re too old for even that.  Some not so great news: the pipes are galvanized steel, and thus have a propensity to rust and prove difficult to work on.  To prep for the plumber’s big project, Chad and I put our work gloves back on and embarked on the type of demo often featured on HGTV.  We were, however, determined not to look as wimpy with a sledge hammer as the owners on TV.

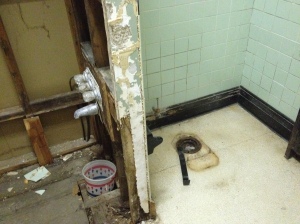
First, the toilet:

Yeeeaaah…and the flusher was broken.

Luckily, the Logan Farm magically produced an extra toilet; however, the plumber said, “You’re replacing this really old toilet…with an old toilet?”

Chad just laughed – it was free, so we’re not looking the gift horse in the mouth.

Luckily, although it was covered in crud, the flange is in tact and ready for the replacement commode.  We were also wondering if the leak marks in the hallway below were from the toilet’s plumbing, but our fancy-shmancy Tupperware container didn’t seem to catch any drips, so we the shower seems to be the culprit.

We plugged the hole to prevent any noxious fumes from escaping:

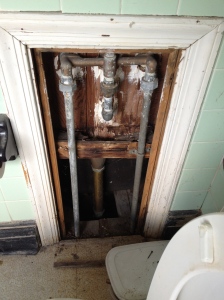
The panel for the plumbing is right next to toilet – the one thing that was moderately convenient in this whole bathroom.

The brass-colored pipe at the bottom in the middle is for the tub’s overflow system; however, our tub had a fatal flaw.  The tub’s overflow hole should be linked to the brass overflow pipe by a connector.  Unfortunately, our tub lacked the connector, and the open hole was separated from the brass pipe by an inch-long gap.  The last handyman’s fix?  Clearly, the tool that fixes everything: DUCT TAPE.

See that duct-tape patch at the top of the tub?  That’s all that was between the dining room ceiling, below, and a really gross tsunami.  I don’t think the duct tape was always up to the job, based on the water stains and the crumbling lathe we found this summer.

Ultimately, the brass pipe would need to come out in order to remove the tub.  After much twisting, torquing, and jiggling, Chad finally resorted once more the Saws-All:

Freeing the tub also requiring removing the layers of surround and tile above the tub.  Enter the sledge hammer…and our rusty kitchen knife.

We didn’t exactly have a putty knife, so the rusty, old kitchen knife we found in May had to do:

You can just call him “Thor.”

Note: we only had one hammer, but we found the back of a crow bar also serves well.

We had to take one portion of tile off all the way to the door frame (on left), revealing some of the original horse-hair plaster and lathe underneath.

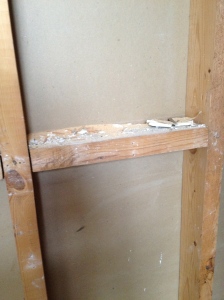
On the back wall (pictured just above), we noticed the framing had some writing – another find!  This time we have the (presumed) contractor signing his framing; he must have been proud!  This also helps us date the bathroom installation (if you crane your neck sideways you can see):

And by helps, we mean date this board explicitly to November 21, 1952, nearly 60 years ago…but that’s nothing for this old house.

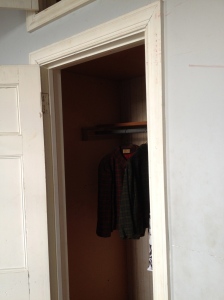
In attempting to get a clear shot of this writing, we had to remove an oddly placed cross two-by-four, which seemed to have a lot of nails fastening it to…something.  We went around to the opposite wall and discovered we had just ripped out the support for the neighboring closet’s clothes bar…oops!

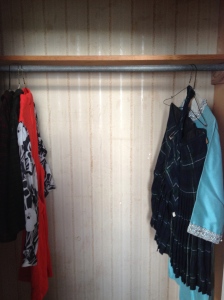
This closet is slated to be gutted, so we weren’t so worried about its structural integrity, but this escapade led us to examine the rear wall of the closet:

Wallpaper!  While someone has obviously gone to great lengths to remove most of the wall paper in the house, this closet went overlooked.  It appears that the general motif does match the style of the papers we found in the attic, so it is a good chance that it is original-ish.

We were glad that the owners who removed the rest of the wallpaper weren’t 100% thorough!

But, back to the bathroom.  We were able to completely finish removing the tile, and with the help of Chad’s dad and brother, were able to get the extremely heavy, cast-iron tub out and down the stairs.  The “finished” product looks like this:

Hopefully next time, we’ll actually be able to show you a bathroom rebuilt, rather than just something we’ve torn down (it’s becoming a theme for us)!

Holy Smokehouse!

So with the summer winding down, we have a few large projects to check off the list before our life becomes back-and-forths between work, law school, and UVA football.  Rachel’s now entered her last week of her summer at BotkinRose in Harrisonburg, and we’ve been commenting a lot on how fast the summer seems to have gone…and then again, how some parts seemed to last forever.  Like the weeks awaiting our appliances, the week without a dryer because it blew up, the week waiting for our first green tomato to turn, or the week when Afton mysteriously developed a stomach ailment and aimed at all of our carpeted surfaces.  What a summer!

And what a lot of work it seems that we have been able to accomplish (even in the face of the mountain ahead).

With all of this reminiscing on our minds, there was one task that we had been putting off – time to call in the reserves.  The in-law reserves, that is.  On a rare weekend with no family events (and no major golf commitments – Steve’s tee time was 6:30 a.m., so he was done before lunch), the Winters Family piled into their car and came to the country….where they were promptly put to work.

Rehabilitating the dependencies is one of the main goals for this fall/winter, and the first step in that process was the removal of all of the debris that decades of neglect and rainstorms have deposited on our poor smokehouse:


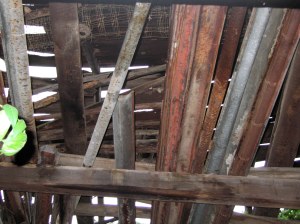
And the view into the rafters:


Apparently the smokehouse had served as a repository for a surprising number of old gutters, unused timber, and a random collection of detritus.  Add a 200 year-old roof and countless windstorms and you get the perfect mix of rotted out support beams, dangling sheet metal, and the worst kind of Jenga you could imagine; a veritable death trap.  Oh, and did I mention that the floor contained a mix of Virginia creeper and POISON IVY?  The. Worst.

After a consultation with our craftsman, Colon, we were told the first step was to remove everything except the four brick walls and any of the structurally sound timbers.  We were advised to obtain scaffolding, and, as luck would have it, Dad purchased some at a sale years ago (and Mom, despite several close calls, did NOT throw away the all-important connector pins which transform scaffolding from pile of metal poles to a useful support structure).

Enter the Winters Fam:


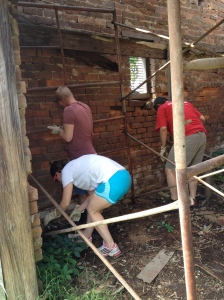
Minus the wedding attire, these folks were ready to get down and dirty:


(We promised Gina some quality time with a sledge hammer.  Wish Granted…oh, and she may have forgotten appropriate footwear and attire…farm wardrobe to the rescue!).

First step:  Haul out all of the ground timber that had fallen over the years and any low-hanging fruit.

Second Step: Construct scaffolding in an area least likely to be struck by falling debris:


Step 3:  Start pulling, and pray your target doesn’t pull back:


Piece by piece, we slowly removed all of the old wood, metal, and trash.  We got two full loads of wood for the burn pile:


And one load of metal for the scrap yard:


As we came to the end, things were looking pretty…well, at least there was no more rotten wood!


(Note the salt line on the brick, above – the demise of the poor sports car in the ’60s.)


There would have originally been a 4×8 beam in each of those notches, and the smokehouse would have had a total of 12 said beams for holding salted meats in the process of being smoked.  When we got into tearing out, only 8 beams remained and of those, the two pictured are the only that we kept, and we might lose one of those to its current state of decomposition.  But hey, one 200 year-old beam is still pretty awesome!

Also, during the deconstruction, we found just a few of the original roof trusses:


Looking more closely:

Wooden peg construction, the real deal!  A profile shot:

While these beams aren’t salvageable, we did get one (!) full length truss (the side that the roof lies on) and one (!) full length cross support, when, together with a second truss, these form the famous “A” frame that originally supported the roof.  We are going to use this construction method as a template for our new structure.

We also found some paneled shutters, which we believe might have been original to the house. There are some louvered shutters on the property as well, but these paneled shutters have peg construction, and appear to be perfect matches to the hinges that are also on the house:

Lastly, we noted that every piece of wood taken from the structure was riddled with nails to hang meats.  After spending the day handling the wood, we noticed we could even smell the smoky scent in the old beams.  It smelled like authenticity.

After our day of de-construction, Rachel and I did a little Google-ing and discovered a few fun facts about smokehouses, which we will leave  you with:

  1. There were originally smokehouses on every self-respecting plantation.  Think of them as modern-day meat refrigerators; if you wanted pork in the summer, it had to be an extremely fresh slaughter or salted and smoked.
  2. Meats would sometimes be kept for 3 years in a smokehouse, and most smokehouses were constructed with very secure doors, as the smoking typically only took place for about a month after slaughtering (February to March), but meat thieves were at it all year long.
  3. Of the 88 original structures found in Colonial Williamsburg, 12 are smokehouses.  It seems that practicality is a good form of preservation.
  4. Smokehouses were traditionally made of wood; “[l]avishing the investment of bricks on a utilitarian building devoted to a smoky, almost industrial use was pure ostentation.”  Lucky us!  It seems that the process of smoking and salting meat is directly inapposite to brick preservation.  As mentioned before, the salt erodes the integrity of the brick, and salty brick is mercilessly attacked by fowl as a source of mineral supplement.

Next post we’ll be back in the house, tackling Dan’s bathroom:


Holy mother of frat bathrooms.

Landscaping: Part Deux

In our last post, we were optimistic for a quick turn-around on the landscaping endeavor.  Alas, stormy weather, Gio’s awesome wedding, and a suspicious rash of farm truck break-downs forced us to push the finishing touches on this project to the back burner.  UNTIL YESTERDAY.

When you last checked in, this is where we were:


Bare, and mercifully vine-less…but with a long row to hoe (insert thigh slap and pathetic laugh here)!

Next step: bring in the tiller!


Our muscle man, Paul, came in with the tiller to remove the massive root structures that were left behind after hacking out the leafy tops.  Voila:


(Looked more dramatic in person, I promise).  Although Paul is quite good with the farm equipment, we asked him not to go TOO close to the house with the ferociously spinning blades, so we came behind him and pulled any remaining roots and stalks out by hand.  It was at this point that Chad and I both learned some fun things.

  1. Urushiol is an oil not exclusive to the leaves of poison ivy plants (which were long-gone at this point), but also exists (and thrives) in the plant’s woody stalks and roots (for up to 5 (!) years).
  2. Gym shorts and a t-shirt with the sleeves cut off do not provide sufficient protection against urushiol.
  3. According to the dermatologist, one of us is in the 15% of the population that is immune to the scourge of urushiol.
  4. Chad is The 85%.

Within 24 hours of exposure, Chad was feeling very itchy and very desperate.  Sam and Gio’s wedding was in 6 days, and there may or may not have been facial swelling (let’s not even talk about the other portions of his body).  Luckily, Harrisonburg has one natural-remedies store, and although we were not interested in the seaweed cookies or homeopathic poison-ivy pills, the jewelweed soap was a god-send.  Combined with a gallon of calamine lotion and self-control against the itch worthy of a gold medal, Chad was looking good as ever for Sam and Gio’s pictures.

With the poison ivy saga and a happily married couple behind us, we felt ready to tackle the yard once more.

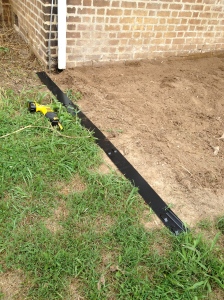
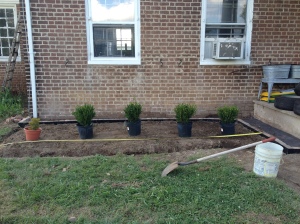
Taking inspiration from Longbranch Plantation in Upperville, we wanted to do a border of pea gravel along the edge of the house to prevent any future weeds and vines from climbing up the brick, fronted by a bed of the five boxwoods I gave Chad for our anniversary.  We started by raking the tilled ground as level as possible, and used landscape edging from Lowe’s to define our beds.

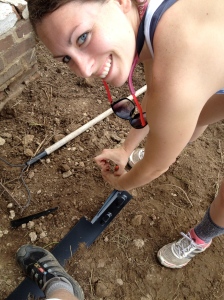
Measure it out, then score with the Saws-All where it needs to turn to keep it approximately 2 feet from the house.  Checking the distance at several places keeps it from looking like you were drinking cocktails while gardening.

Each piece of edging comes with 4 stakes to secure the piece at various places.

And, as always, Afton was nothing but helpful.

Next, time to class it up.  Remember those bricks in the dirt mound a few weeks ago?  Part of the process of salvaging the brick was segregating the perfect bricks from those that had chips, cracks, and missing parts.  Although we can’t use these broken bricks in any structures, we collected two full pallets that are PERFECT for landscaping:

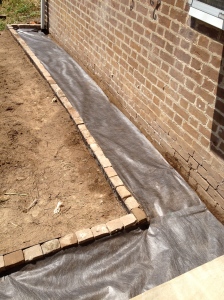
We dug a little trench along the edging, nestled the bricks in, with the good edge up, and packed extra dirt around them to keep the line secure.

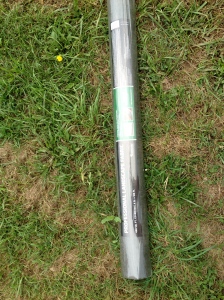
Finally, we used landscape fabric and accompanying pins (also from Lowe’s) –

– and laid it out across the bed to even further prevent weeds and vines.

After laying the fabric, we topped it off with the gravel.  Chad found an unexpected good deal on reclaimed stone from a flat-roofed building at Grass Roots Landscaping outside Harrisonburg.  It turned out to have a little dirt in it, but otherwise was exactly what we wanted.

(Please note: Chad’s brother, Daniel, is in the process of moving in with us!  He brought a bed, clothes, and…”road” tires for the ‘Stang.  Not entirely sure what that means, but they totally work with our decor).

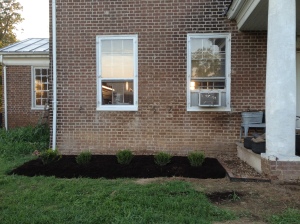
FINALLY, we were going to plant these dang boxwoods.  Same process applied for this step as with the one before: level with a rake, plant the boxwoods, cover with landscaping fabric, top with mulch.

We measured to allow for the average maximum diameter of 3 to 5 feet – we’re hoping eventually the line of individual plants will merge into a stately hedge.

Bring in the mulch!

And (drumroll, please)…..

Fewer bugs, less poison ivy, and a little easier on the eyes.

Now, let the sun shine – we’ll provide the daily 25 gallons of water from the spigot across the yard!